Setup the Canvas
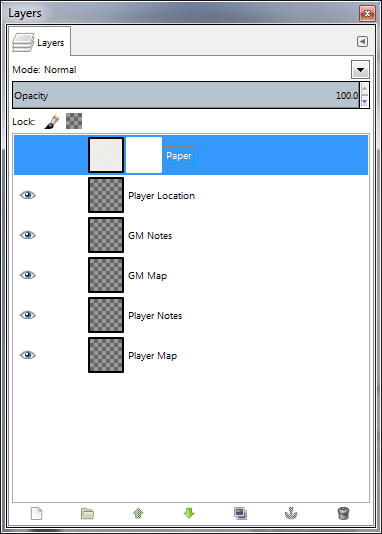
For this demo I'm going to use a base layout sized to 2x2 full gemorphs. That ends up being a 4000x4000 image. Open Gimp and create a new image with those dimensions, which gives us our blank canvas to work from. Next I'm going to modify the initial layer and create some new ones. All these are going to be transparent layers for now. From top to bottom they are:
- Paper - This will contain my 'fog of war' texture that hides the unexplored areas of the map.
- Player Location - I mark the party's current location(s) with a big red X. I keep this on a separate layer to make it easy to move.
- GM Notes - My private notes on the level.
- GM Map - The GM version of the map, which is built from the GM version of the geomorph tiles.
- Player Notes - Player notes and room names for ease of reference.
- Player Map - The player version of the map, built from the player version of the geomorph tiles.
Pretty straight-forward. Note that if you're actually using a VTT program, you probably don't need the Paper layer since VTTs usually support fog of war. You won't need the Player Location layer either, since you'll have tokens for characters.
Set the Grid
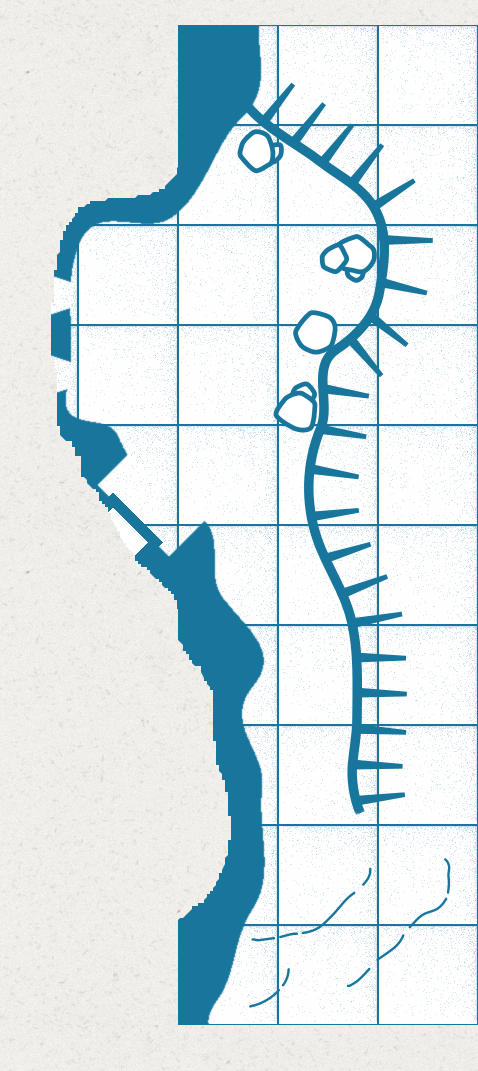
Use the built in grid feature to create a grid that matches the scale of your map. For Dungeons in Blue, this is 100x100px. I lay out the map with the grid shown and snap to grid turned on, so I can easily align geomorphs.
Paper Layer
 This one is easy. Find a seamless paper texture and pattern-fill the layer with it. Next create a layer mask and set it to 100% opacity. Be sure you select the layer mask for editing, as you'll be using that to cut through the paper by filling areas with black. You'll want to hide this layer for now, so you can see what you're doing.
Add Geomorphs
Pick out the tiles you want to use for your dungeon. Don't forget you can rotate / flip tiles to make things match (though flipping may require some text touch-up). Once you have your tiles collected, use Open as Layer to open them all into individual layers. This will make a mess (in my example images I'm leaving some areas unfinished so it's easier to see what I'm doing).
Organize by adjust the ordering in your layer dialog so all player versions are above the Player Map layer and all GM versions are above the GM Map layer. Use the Move tool to organize your layers into a cohesive map. You may have to hide some layers as you go to see what you're doing and can grab the right layer. Snap to grid is really useful here. Once you're satisfied with your map, use the layer Merge Down option to merge GM geomorphs into the GM Map layer, and player geomorphs into the Player Map layer. Now we're back to our initial layer configuration.

Cleanup
If you feel the need, check any text in the map and adjust its orientation. Since most Dungeons in Blue tiles only have stair direction indicators, this is a minimal task. Use Rectangle Select to select the letter, Float Selection, rotate / flip layer as needed, then anchor it. If your map doesn't completely fill the canvas, you can flood fill the rest of the area as desired.
Dungeon in Blue note: the stair indicators are done in 42px Arial Bold, lower case 'u' and 'd' using pure white. The blue I use is RGB 18769d.
Using Fog of War

Turn the Paper layer on at 50% opacity. I also set the GM layer to 50% so I can see it, but the intensity difference reminds me to turn it off for export. In this example I want to expose the entry area on the east side and export it as a map for my players. To do this I use the selection tools to select the desired visible area. Then, being sure to have the Paper layer layer mask selected, I fill with black. This effectively turns the paper layer to 0% opacity in the selected area. When I turn up the overall layer opacity, I end up with a map showing only the visible area.
Of course you can be fancier about some of this. For example instead of fog of war you could use a circle brush to 'paint' lantern light on a layer mask. For my purposes though, simple fog of war works.
Export
 When saving off a map for the web, I use Rectangle Select to select the minimal rectangle that surrounds the visible area, then (after insuring I only have player info showing), I use Copy Visible and Paste as New Image to create my map.
Aaand, we're about done. I hope this proves helpful.
No comments:
Post a Comment
Note: all comments are moderated to block spammers. Please be polite.